| On this page |
This covers how to expose
A few key things you will learn in this workflow:
-
Houdini landscape generation
-
create and edit Heightfields
-
Simulation using
 Heightfield Flow Field SOP and
  Merge Packed SOP
 -
work with masks
-
expose parameters to HDA for edits in Unreal Engine
-
material attribute setup for both HDA and Unreal Engine
Copy over the HDA file 
Before you begin, copy the Houdini HDA file that you will be working with throughout this workflow:
-
Open a file browser window and then navigate to your Houdini Engine install directory.
-
In the install directory, navigate to the
\Plugins\HoudiniEngine\Content\Examples\hdafolder. -
In the
\hdafolder, copy theHEUE_Geometry_Fence.hdafile. -
Navigate to your user directory and then create a new folder named
\ProceduralModeling. -
In the
\ProceduralModelingworking folder, paste the HDA file. -
Run Houdini.
-
Open the
HEUE_Geometry_Fence.hdaworkflow file and become familiar with its contents.
Inspect Houdini setup (optional) 
The following sections inspects how the content example was created and a few important setups before going into Unreal. You can skip to the Import to Unreal section to see the Unreal setup.
Mesh generation setup 
-
Double-click LMB the
geo1to enter into Geometry view. Then double-click LMBhece_geometry_fence1to enter the Surface Operator network view. -
Double-click LMB the
Mesh_Generationsubnetwork. You can now see the setup for the procedural modeling fence. -
Locate the
 Output SOP at the end of the node network.
-
This node is important to add to the end of your modeling setup. Houdini Engine for Unreal reads the Output SOP node and exports your entire node network. If you want to export a specific node, select that node and set the display flag on it.
-
Mesh Prep setup 
This example uses packed primitives to export multiple geometries using one HDA. It also shows how to use special attributes to send a bake folder and output name to Unreal.
-
In the SOP view of
hece_geometry_fence1, double-click LMBMesh_Prepsubnetwork. -
Select the
 Attribute Create SOP namned
 attribcreate_path.-
The Name parameter is set to
unreal_bake_folderwhich sets the folder path to where your bakes output to in Unreal. This can be useful to organize a large batch of baked assets instead of using the default folder. See Attributes and Groups for more information. -
The String parameter is set to
chs("../../out_path"). Thechsrepresents the channel string and theout_pathis a name used later for a promoted parameter. This is explained in the Promote parameters for export section.
-
-
The Attribute Create SOP named
attribcreate_nameperforms a similar task but using theunreal_output_nameattribute which allows you to set the name of the baked asset. -
The sequence from the
 Blast SOP to the
  Merge SOP separates the fence into
 planks,support_beams, andend_post. You can use packed primitives to separate multiple meshes in your output. See Mesh generation for more information.
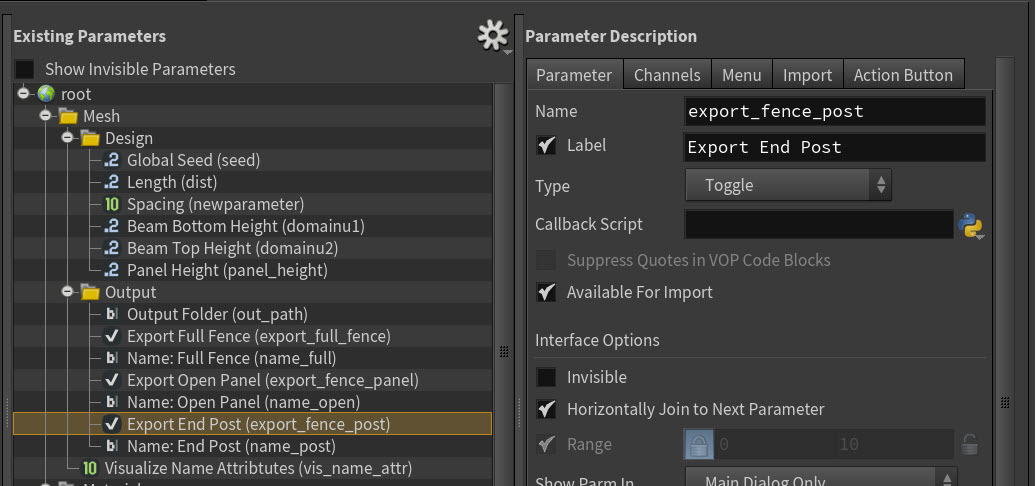
Promote parameters for export 
-
RMB the
hece_geometry_fence1and select Type Properties. Locate the Parameters tab. -
On the Existing Parameters section, you can see all the promoted parameters that will carry forward into Unreal.
-
In the Design folder, these promoted modeling parameters allows you to change them in real-time in Unreal before baking it out into an asset.
-
In the Output folder, these promoted naming parameters allows you to rename the different meshes and set the baked folder on the HDA before baking it into an asset.
-
Create HDA for Unreal 
-
Step out into Geometry view, RMB the
hece_geometry_fence1subnetwork and select Create Digital Asset. -
In the pop-up window, change the Asset Label name to
hece_geometry_fence.-
You can change the other settings to your preference.
-
-
Select Acccept.
Import into Unreal 
Make sure you have a Houdini Engine for Unreal session running. See Session for more information.
-
In Unreal, import the
fence_examplev01HDA. -
RMB the HDA and select Instantiate at the origin.
-
You should now see the fence in the viewport.
-
Change Houdini parameters 
During the Houdini setup, certain parameters were promoted to use them in Unreal.
-
In Houdini Parameters detail panel, locate the Mesh tab.
-
You can see the exported parameters from Houdini that you are able to change in Unreal now.

-
-
Change the parameters and see the fence change in real-time in the viewport.
-
In the Output section, you can see geoemetry exports, renaming, and vizualization parameters.
-
The
Output Folderallows you to set the output path for the baked assets. -
The export checkboxes allows you to bake out separate geometries for the full fence, panel, and fence post. If you check multiple ones, they will bake out as separate Unreal Static Mesh Actors. You can also set the name of the baked out assets.
-
The
Visualize Name Attributesdropdown allows you to visualize the mesh name or output folder as text in the viewport.

-
Bake into actor 
Once you're done with the fence parameters, you can bake the HDA to change it into an Unreal Static Mesh Actor.
-
In the outliner, select the
fence_examplev01HDA. -
In the Houdini Engine panel, select Bake.
-
In the outliner, you should see a folder
fence_examplev01with the Static Mesh Actors you checked to export. They are also named to the label you put in the output fields.

-
| See also |